To connect AirPods to your computer, you first need to make sure Bluetooth is turned on by going to Settings > Bluetooth. Place the AirPods in their case, open the lid, and press the setup button on the back until the light flashes white.
In your computer’s Bluetooth settings, find your AirPods in the list of available devices. Select your AirPods and click Connect. Once connected, your AirPods will be ready for use, and they should automatically reconnect in the future.
Step-by-step: Adding AirPods to Your Computer
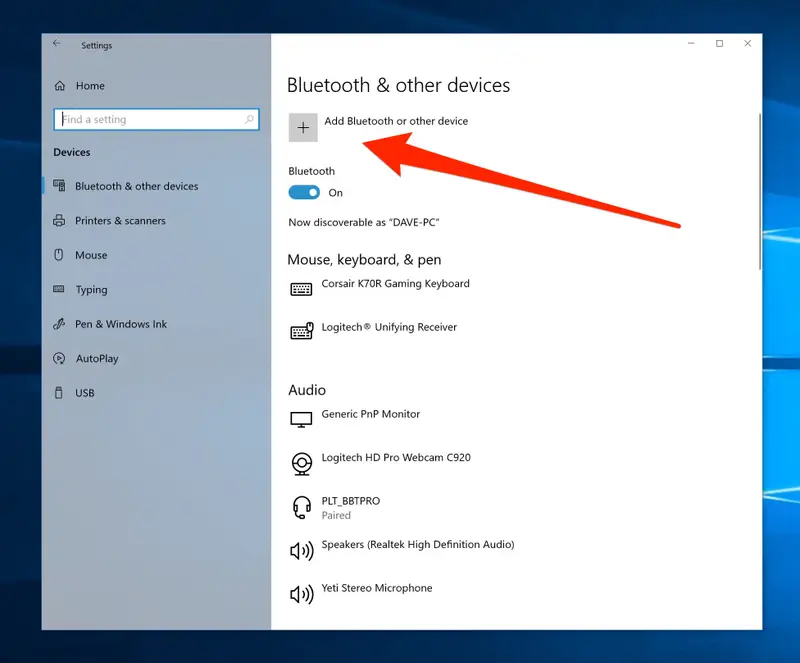
- Open Bluetooth settings:
Navigate to the Bluetooth settings on your computer. This is typically found in the system settings or control panel.
- Turn on Bluetooth:
Ensure that Bluetooth is enabled. A toggle switch or button should indicate its status.
- Activate Pairing Mode:
Open the AirPods case and press the button on the back until the LED blinks white.
- Find Your AirPods:
In the list of discoverable devices on your computer, look for your AirPods. They might appear as “AirPods” or “YourName’s AirPods.”
- Connect Your AirPods:
Click on your AirPods in the list to initiate the connection. Your computer should confirm once they are successfully connected.
This step-by-step guide makes the process clear and simple. Each step ensures you’re on track toward enjoying your wireless sound experience.
Recently Post: How to paste something on an iPhone?
How to Connect AirPods from a Computer?
Once you’ve added your AirPods to your computer, connecting them is a breeze. Whenever Bluetooth is on, your AirPods should automatically connect to the computer once taken out of the case. If not, follow these steps:

- Turn on Bluetooth:
Check that Bluetooth is enabled in your computer’s settings.
- Select AirPods from Available Devices:
In the Bluetooth menu, find your AirPods listed among available devices.
- Confirm the Connection:
Click on your AirPods to connect. A notification will usually indicate a successful connection.
Knowing these steps not only saves time but also ensures you maintain a seamless listening experience without interruptions.
Adding AirPods to a Windows Laptop
Adding AirPods to a Windows laptop follows a similar process, with a few nuances specific to Windows systems. Here’s how:
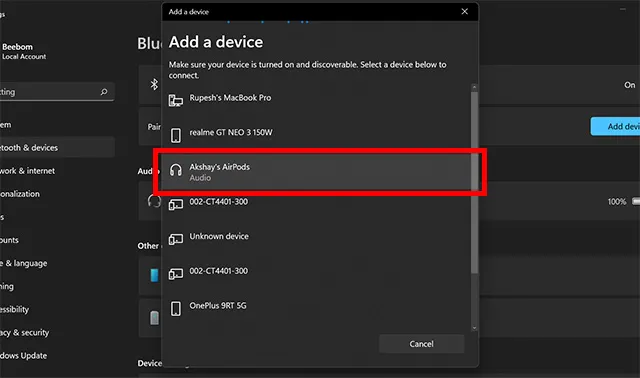
- Access Settings:
Open the Start menu and go to ‘Settings.’
- Navigate to Devices:
Click on ‘Devices’ and choose ‘Bluetooth & other devices.’
- Turn on Bluetooth:
Ensure the Bluetooth toggle switch is on.
- Activate Pairing Mode on AirPods:
With the AirPods case open, press the button until the light flashes white.
- Add Bluetooth Device:
Click ‘Add Bluetooth or other device,’ and select ‘Bluetooth.’
- Select Your AirPods:
Click on your AirPods from the list of devices to pair them.
Following these steps helps ensure your AirPods are seamlessly added, and ready to use whenever you need them.
Connecting AirPods from a Windows Laptop
Connecting AirPods to a Windows laptop after they’ve been added is just as important as the initial setup. Here’s what to do:
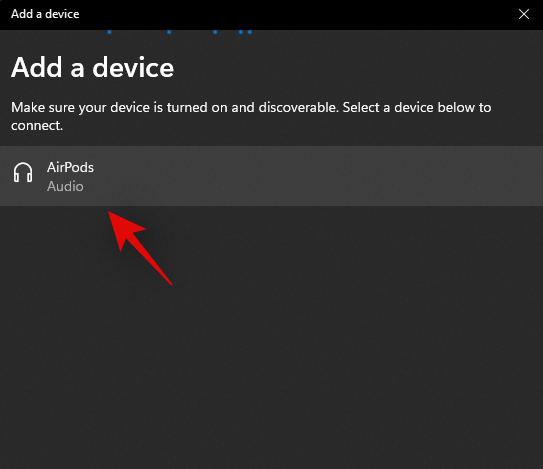
- Open Bluetooth Settings:
Go to Bluetooth settings through the Start menu or taskbar.
- Ensure Bluetooth is On:
Double-check that Bluetooth is enabled.
- Select AirPods from Previously Paired Devices:
Within the Bluetooth menu, find the list of paired devices and click on your AirPods.
- Initiate Connection:
Click ‘Connect.‘ A confirmation message should appear once your AirPods are successfully connected.
These instructions ensure you’re always prepared to connect without fuss, allowing for uninterrupted audio enjoyment.
Adding AirPods to a Mac
Adding your AirPods to a Mac is a relatively straightforward task, thanks to Apple’s ecosystem. Here’s how:
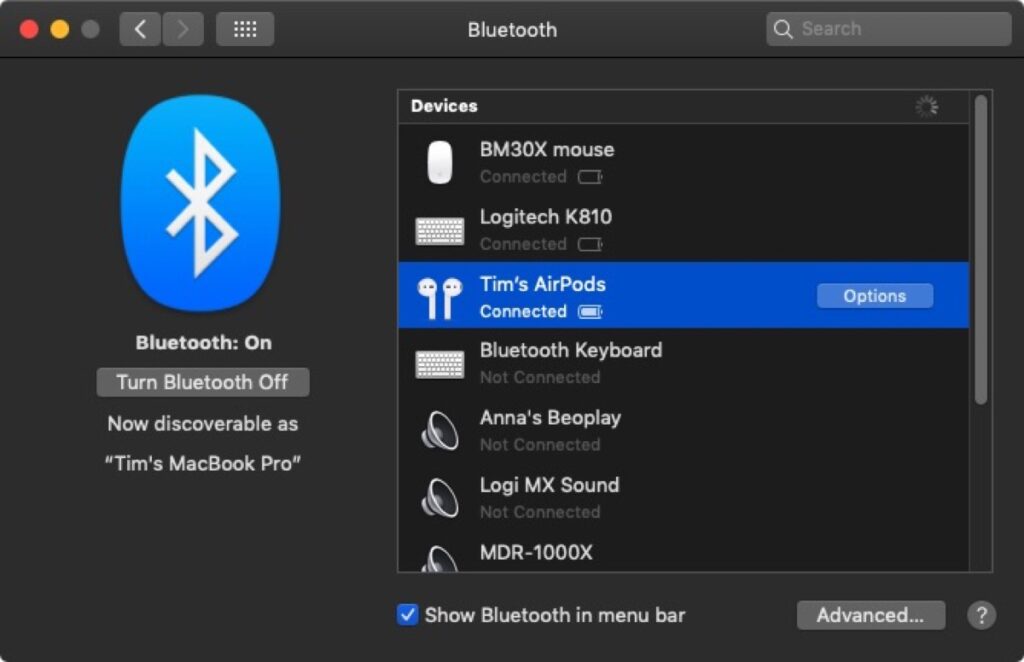
- Open System Preferences:
Click the Apple menu and select ‘System Preferences.’
- Go to Bluetooth:
Open the Bluetooth section.
- Enable Bluetooth:
Ensure Bluetooth is turned on.
- Put AirPods in Pairing Mode:
Open the case and hold the button until the LED blinks white.
- Connect AirPods:
Once your AirPods appear in the list, click ‘Connect.’
With these steps, your AirPods are now integrated into your Mac, ready for all your audio needs at any time.
Connecting AirPods from a Mac
Once you’ve added your AirPods, connecting them again is simple. Here’s a quick guide:
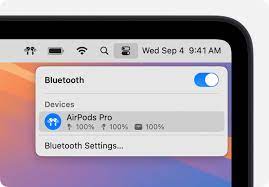
- Access Bluetooth Menu:
Click the Bluetooth icon in the menu bar or go to System Preferences.
- Locate Your AirPods:
Find your AirPods in the list of devices.
- Click to Connect:
Select your AirPods and click ‘Connect.’
These steps make it easy to connect and start using your AirPods whenever needed, ensuring a hassle-free experience.
Disconnecting AirPods from a Mac
Disconnection is sometimes necessary, either for troubleshooting or switching devices. Here’s how:
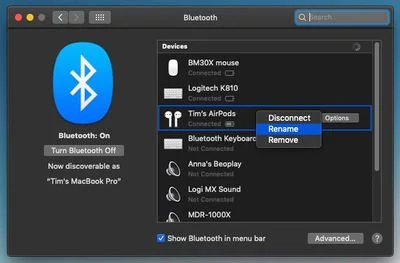
- Navigate to Bluetooth:
Open System Preferences and click on Bluetooth.
- Find Your AirPods:
In the list of connected devices, locate your AirPods.
- Disconnect:
Click on your AirPods and select ‘Disconnect.‘
This process allows for easy management of your device connections, maintaining a smooth workflow.
Disconnecting AirPods from a Laptop or Computer
If you need to disconnect your AirPods from a Windows laptop or generic computer, follow these steps:
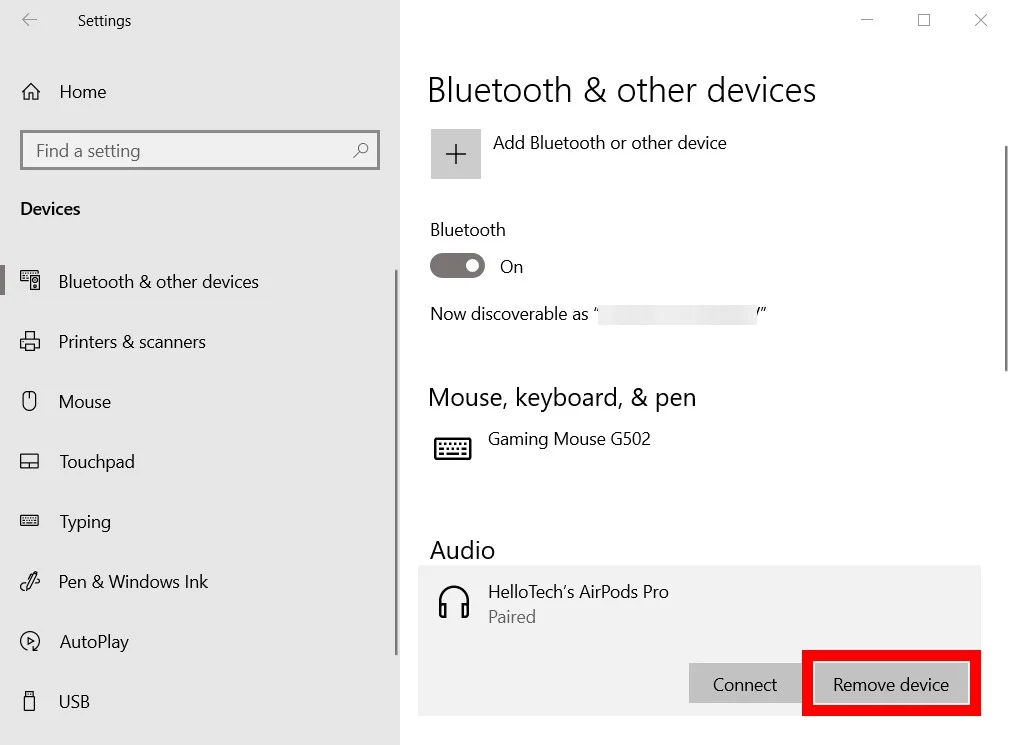
- Open Bluetooth Settings:
Access the Bluetooth settings through your system’s control panel or taskbar.
- Locate Your AirPods:
In the list of devices, find your AirPods.
- Select to Disconnect:
Click on your AirPods and choose ‘Remove device‘ or ‘Disconnect.’
These steps help manage your connections, ensuring your devices are ready when you need them, without unnecessary complications.
Suggested Post: How to Screenshot on Your Laptop?
Conclusion
Connecting your AirPods to any computer can enhance your audio experience, providing convenience and flexibility.
From Windows laptops to Macs, each system offers a straightforward method to add and connect your AirPods, allowing you to enjoy clear, high-quality sound without wires.
Remember, managing these connections adding, connecting, and disconnecting is key to maintaining a seamless user experience.
Faqs
How do I add AirPods to my Apple computer?
Open Bluetooth settings on your Mac, put AirPods in pairing mode, and click Connect when they appear.
How to put AirPods in pairing mode?
Place your AirPods in the charging case, open the lid, and press the setup button on the back until the light flashes white. This indicates the AirPods are in pairing mode.
How to make AirPods discoverable?
Place your AirPods in the charging case, open the lid, and press the setup button on the back until the light flashes white. This makes them discoverable.
How to connect earbuds to a laptop?
Ensure Bluetooth is enabled on your laptop, then put your earbuds in pairing mode. Select your earbuds from the list of available devices in the Bluetooth settings and click Connect.
How do I connect my AirPods to my computer?
Enable Bluetooth on your computer, then open the AirPods case and press the setup button until the light flashes white.
Select your AirPods from the list of available devices in Bluetooth settings and click Connect.
How to add AirPods to a computer Windows 10 or 11?
Enable Bluetooth on your Windows 10 or 11 computer, then put your AirPods in pairing mode by pressing the setup button until the light flashes white.
Select your AirPods from the list of available devices in Bluetooth settings and click Connect.

1 thought on “How to add AirPods to a computer? (Easily Quick Guide 2024)”